The Problem: Ad Blockers and Your Analytics Data
Here’s something worth thinking about if you run an analytics or tech blog: your readership is likely full of people who block ads — and with them, your tracking scripts.
Browser extensions like uBlock Origin block requests to well-known analytics endpoints like collect.tealiumiq.com or google-analytics.com by matching against public block lists. Your tracking code fires on the page, the browser quietly drops the request, and you never see that visit.
For a general-audience site this might be 10–15% of traffic. For an analytics-practitioner audience? Comfortably 30–50%. Which means a significant chunk of the people most likely to engage with your content are invisible to you.
The fix is a first-party proxy: instead of sending events directly from the browser to a third-party endpoint, you send them to your own domain first (/collect or similar), and a server-side function forwards them onward. Ad blockers don’t know what to do with a request to your own domain — it doesn’t match any block list — so it goes through.
This post walks through a complete implementation using Netlify Functions as the proxy layer and Tealium’s server-side HTTP API as the destination. The blog you’re reading this on runs exactly this setup ✨.
Architecture Overview
Browser
  └─ POST /.netlify/functions/collect
       └─ Netlify Function (Node.js)
            ├─ Validates origin
            ├─ Enriches payload (real IP, timestamp)
            └─ POST https://collect.tealiumiq.com/event
The client-side snippet never touches tealiumiq.com directly. From the browser’s perspective, the only outbound call is to your own domain. The Netlify function does the forwarding server-side, where no browser extension can interfere.
A secondary benefit: you can enrich events with data the browser can’t reliably provide, like the real client IP (useful for geo lookups) without relying on client-side libraries.
What You’ll Need
- A site hosted on Netlify (free tier is fine)
- A Tealium account with an EventStore or HTTP API Data Source set up
- Node.js familiarity for reading the function code — you won’t need to write any from scratch
Step 1: Create a Tealium HTTP API Data Source
In Tealium iQ or Tealium Customer Data Hub, you need a Data Source that accepts HTTP POST requests. This gives you a Data Source Key — the credential your Netlify function will use to authenticate with Tealium’s collect endpoint.
- Go to Server-Side → Sources → Add Data Source
- Choose HTTP API
- Name it something like
measureaddict-proxyor similar - Copy the Data Source Key — you’ll need it shortly
If you already have a server-side source configured, you can reuse its key.
Step 2: Add the Netlify Function
Create the file netlify/functions/collect.js at the root of your repository. Netlify automatically picks up any files in netlify/functions/ and deploys them as serverless functions — no configuration needed.
/**
 * First-party analytics proxy
 * Receives events from the client and forwards them to Tealium's HTTP API.
 *
 * Required env vars:
 *   TEALIUM_ACCOUNT      e.g. "measureaddict"
 *   TEALIUM_PROFILE      e.g. "main"
 *   TEALIUM_DATASOURCE   Data Source Key from Tealium EventStore
 */

const TEALIUM_COLLECT_URL = "https://collect.tealiumiq.com/event";

const ALLOWED_ORIGINS = [
  process.env.ALLOWED_ORIGIN || "https://measureaddict.com",
  "https://deploy-preview--measureaddict.netlify.app",
];

exports.handler = async function (event) {
  const origin = event.headers["origin"] || "";

  if (event.httpMethod === "OPTIONS") {
    return corsResponse(origin, 204, "");
  }

  if (event.httpMethod !== "POST") {
    return corsResponse(origin, 405, JSON.stringify({ error: "Method not allowed" }));
  }

  if (!ALLOWED_ORIGINS.some((o) => origin.startsWith(o))) {
    return corsResponse(origin, 403, JSON.stringify({ error: "Forbidden" }));
  }

  let payload;
  try {
    payload = JSON.parse(event.body || "{}");
  } catch {
    return corsResponse(origin, 400, JSON.stringify({ error: "Invalid JSON" }));
  }

  if (!payload.event_name || typeof payload.event_name !== "string") {
    return corsResponse(origin, 400, JSON.stringify({ error: "event_name required" }));
  }

  const serverData = {
    server_timestamp_ms: Date.now(),
    client_ip: event.headers["x-nf-client-connection-ip"] ||
               event.headers["x-forwarded-for"]?.split(",")[0].trim() ||
               "unknown",
    user_agent: event.headers["user-agent"] || "",
  };

  const tealiumPayload = {
    tealium_account:    process.env.TEALIUM_ACCOUNT,
    tealium_profile:    process.env.TEALIUM_PROFILE,
    tealium_datasource: process.env.TEALIUM_DATASOURCE,
    tealium_event:      payload.event_name,
    ...payload,
    ...serverData,
  };

  if (!tealiumPayload.tealium_account || !tealiumPayload.tealium_profile || !tealiumPayload.tealium_datasource) {
    console.error("collect: missing Tealium environment variables");
    return corsResponse(origin, 500, JSON.stringify({ error: "Server misconfiguration" }));
  }

  try {
    const response = await fetch(TEALIUM_COLLECT_URL, {
      method: "POST",
      headers: { "Content-Type": "application/json" },
      body: JSON.stringify(tealiumPayload),
    });

    if (!response.ok) {
      console.error(`collect: Tealium returned ${response.status}`);
      return corsResponse(origin, 502, JSON.stringify({ error: "Upstream error" }));
    }

    return corsResponse(origin, 200, JSON.stringify({ ok: true }));
  } catch (err) {
    console.error("collect: fetch to Tealium failed", err);
    return corsResponse(origin, 502, JSON.stringify({ error: "Upstream unreachable" }));
  }
};

function corsResponse(origin, statusCode, body) {
  const isAllowed = ALLOWED_ORIGINS.some((o) => origin.startsWith(o));
  return {
    statusCode,
    headers: {
      "Content-Type": "application/json",
      "Access-Control-Allow-Origin": isAllowed ? origin : "",
      "Access-Control-Allow-Methods": "POST, OPTIONS",
      "Access-Control-Allow-Headers": "Content-Type",
      "Cache-Control": "no-store",
    },
    body,
  };
}
What the function does
Origin check — the function rejects any request that doesn’t originate from your domain. This stops random third parties from abusing your proxy to send junk events to your Tealium account.
Server-side enrichment — the serverData block adds fields that the client either can’t know or shouldn’t be trusted to report. Netlify sets x-nf-client-connection-ip to the real client IP even when the request comes through a CDN, which is handy for geo-enrichment downstream in Tealium.
Server fields overwrite client fields — notice that ...serverData comes after ...payload in the tealiumPayload spread. This means a client can’t fake a client_ip or server_timestamp_ms by including those in the POST body.
Graceful failure — every error path returns a meaningful HTTP status but never throws an unhandled exception. If Tealium is unreachable, the function returns 502 and logs the error to Netlify’s function logs. The client snippet (below) discards errors silently, so a Tealium outage never breaks page behaviour.
Step 3: Add the Client-Side Snippet
Create static/js/collect.js. This is the lightweight script that fires on every page load and sends events to your function:
(function () {
  "use strict";

  var ENDPOINT = "/.netlify/functions/collect";

  function send(data) {
    if (!data || !data.event_name) return;

    var payload = JSON.stringify(data);

    if (navigator.sendBeacon) {
      var blob = new Blob([payload], { type: "application/json" });
      navigator.sendBeacon(ENDPOINT, blob);
    } else {
      fetch(ENDPOINT, {
        method: "POST",
        headers: { "Content-Type": "application/json" },
        body: payload,
        keepalive: true,
      }).catch(function () {});
    }
  }

  function pageContext() {
    return {
      page_url:      window.location.href,
      page_path:     window.location.pathname,
      page_title:    document.title,
      page_referrer: document.referrer || "",
      screen_width:  screen.width,
      screen_height: screen.height,
      language:      navigator.language || "",
    };
  }

  function trackPageView() {
    send(Object.assign({ event_name: "page_view" }, pageContext()));
  }

  // Public API for custom events
  window._measure = function (data) {
    send(Object.assign({}, pageContext(), data));
  };

  // Auto page_view
  if (document.readyState === "loading") {
    document.addEventListener("DOMContentLoaded", trackPageView);
  } else {
    trackPageView();
  }

  // Outbound link clicks
  document.addEventListener("click", function (e) {
    var el = e.target.closest("a[href]");
    if (!el) return;
    var href = el.getAttribute("href");
    var isExternal =
      href &&
      (href.startsWith("http://") || href.startsWith("https://")) &&
      !href.includes(window.location.hostname);
    if (isExternal) {
      window._measure({
        event_name: "outbound_link_click",
        link_url:   href,
        link_text:  el.innerText.trim().substring(0, 100),
      });
    }
  });
})();
A note on sendBeacon
The snippet uses navigator.sendBeacon where available. Beacon requests are fire-and-forget and — crucially — they survive page navigation. If a user clicks a link immediately after landing on a page, a regular fetch might be cancelled before it completes. sendBeacon queues the request with the browser and guarantees delivery even as the page unloads. The keepalive: true on the fetch fallback does the same for browsers without Beacon support.
Step 4: Load the Script on Every Page
If your Hugo theme has a layouts/partials/extra-in-head.html partial (many do), override it at the project level by creating layouts/partials/extra-in-head.html in your own repo:
<script src="{{ .Site.BaseURL }}js/collect.js" defer></script>
The defer attribute means the script downloads in parallel with HTML parsing and executes after the document is ready — no render blocking, and document.title is guaranteed to be populated when trackPageView runs.
If your theme doesn’t have this hook, add the script tag just before the closing </body> in your base layout.
Step 5: Set Environment Variables in Netlify
In Netlify, go to Project configuration → Environment variables and add:
| Variable | Example value |
|---|---|
TEALIUM_ACCOUNT | measureaddict |
TEALIUM_PROFILE | main |
TEALIUM_DATASOURCE | abc123xyz (from your Data Source Key) |
These are never exposed to the browser — they live only in the function’s server-side execution environment. Deploy the site after setting them.
Testing Locally with Netlify CLI
Hugo’s built-in hugo server has no awareness of Netlify Functions — requests to /.netlify/functions/collect would simply 404. To test the full setup locally you need the Netlify CLI, which emulates the functions runtime and proxies it alongside Hugo on a single port:
npm install -g netlify-cli
netlify dev
netlify dev reads your netlify.toml, starts Hugo, and serves everything — including functions — at http://localhost:8888. The /.netlify/functions/collect endpoint works exactly as it does in production, so you can verify events are reaching Tealium before you deploy.
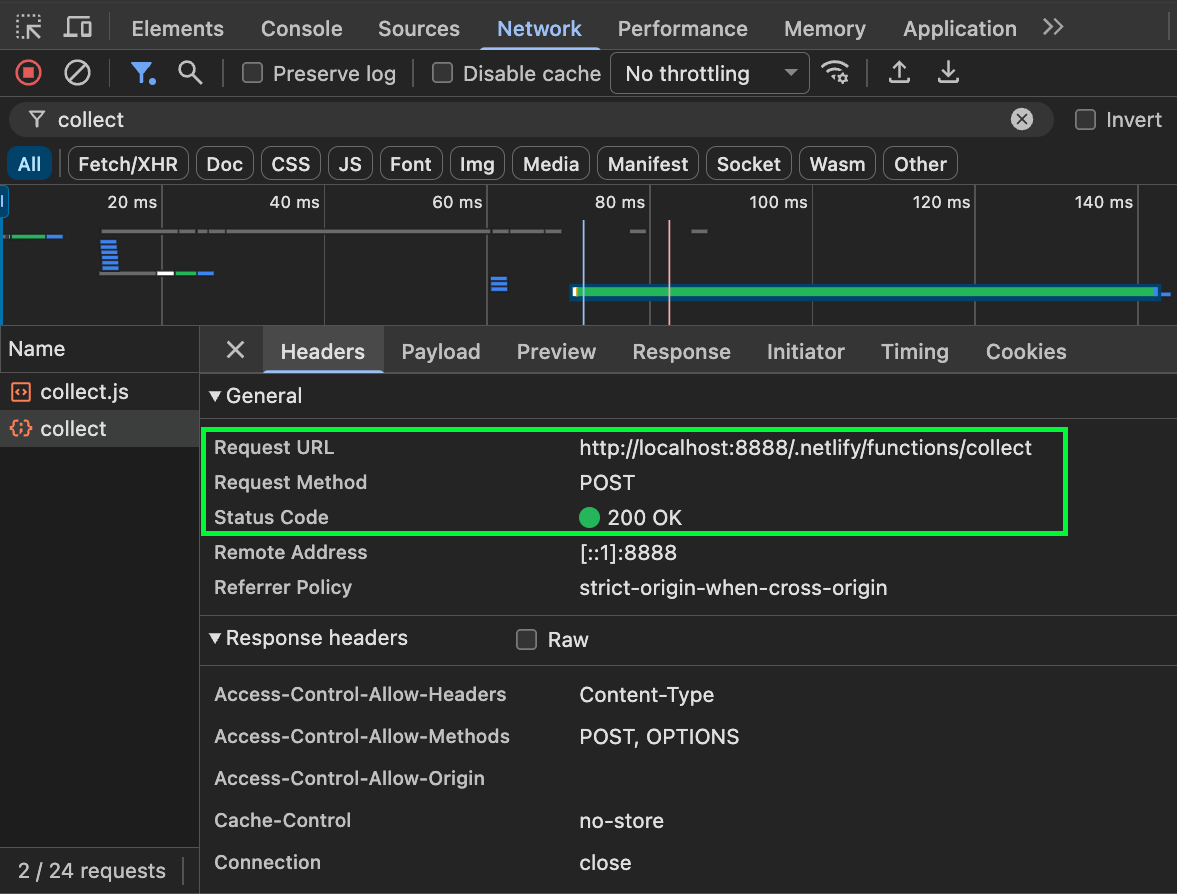
Step 6: Verify It’s Working
Open your browser’s DevTools → Network tab and filter by collect. On page load you should see a POST to /.netlify/functions/collect returning 200 with body {"ok":true}.
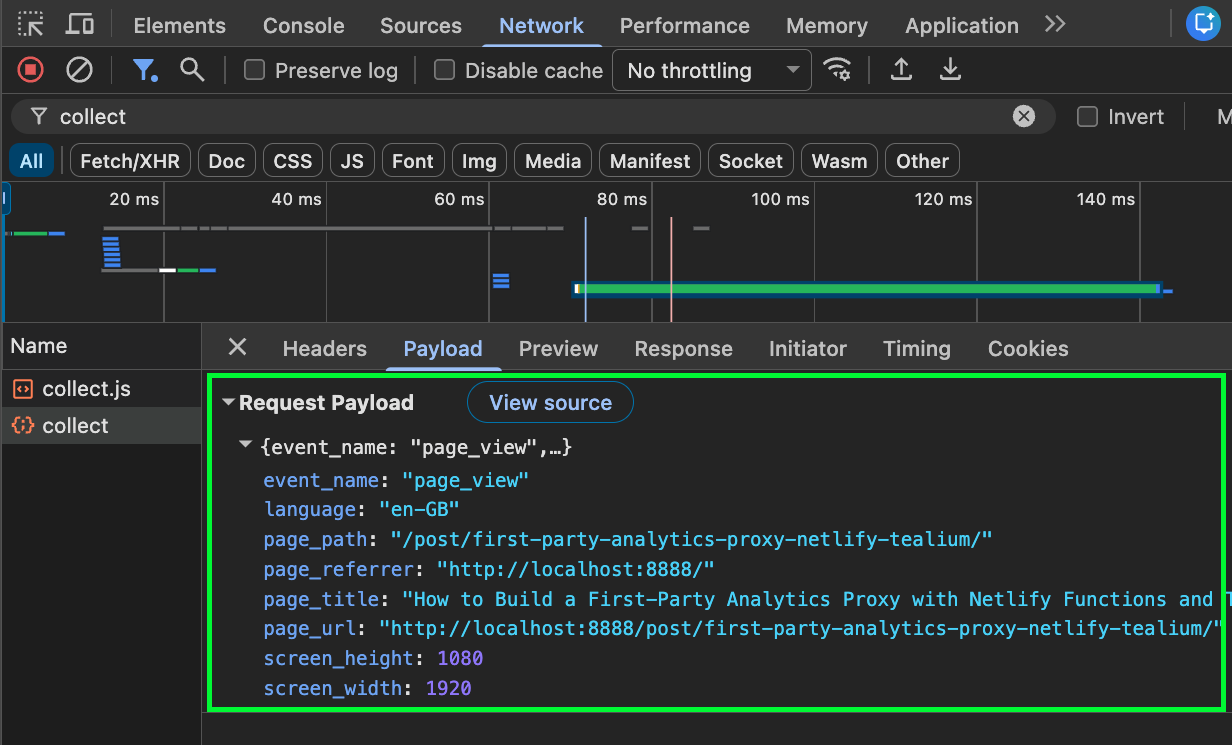
The Payload tab shows all the fields sent by the client snippet — event_name, page context, and screen dimensions — exactly as they’ll arrive in Tealium.
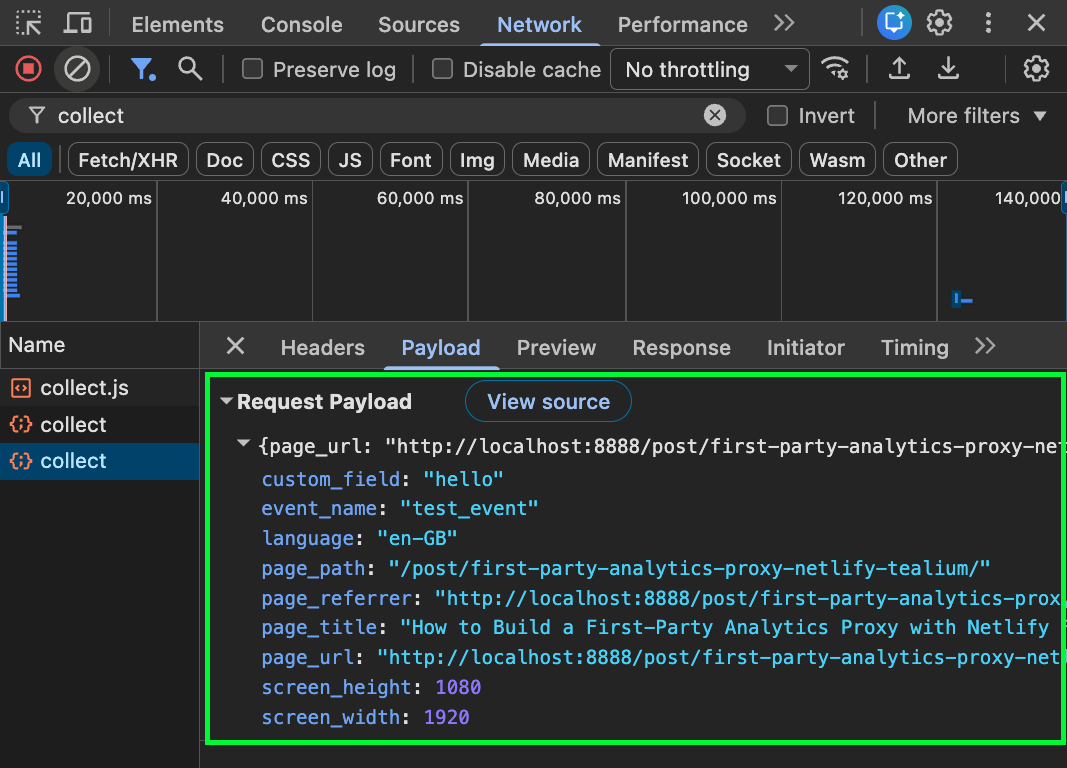
If you wish to test custom events from the console, try:
window._measure({ event_name: "test_event", custom_field: "hello" });
This will result in the test event:
On the Tealium side, open Live Events in your Data Source to confirm the events are arriving. You should see page_view events with the fields from pageContext() plus the server-enriched client_ip, user_agent, and server_timestamp_ms.
Testing on a Netlify Deploy Preview
If you’d rather test on a real Netlify environment before merging to master, push your changes to a feature branch — Netlify will automatically build a deploy preview with a unique URL:
git checkout -b feature/first-party-proxy
git add netlify/functions/collect.js static/js/collect.js layouts/partials/extra-in-head.html
git commit -m "feat: add first-party analytics proxy"
git push origin feature/first-party-proxy
Netlify picks up the push and builds a preview at a URL like https://deploy-preview-1--measureaddict.netlify.app. The ALLOWED_ORIGINS array in the function already includes the deploy-preview--measureaddict.netlify.app pattern, so the origin check passes and the function behaves exactly as it will in production. Once you’re happy, merge to master.
Sending Custom Events from Your Templates
The snippet exposes window._measure globally, so you can fire custom events from anywhere. For example, to track when someone clicks a specific CTA:
<button onclick="window._measure({ event_name: 'cta_click', cta_label: 'Subscribe' })">
  Subscribe
</button>
Or from an inline script in a Hugo shortcode:
<script>
  document.addEventListener("DOMContentLoaded", function () {
    window._measure({ event_name: "code_snippet_view", post_slug: "{{ .Page.Slug }}" });
  });
</script>
What You Get in Tealium
Every event arriving at your Tealium Data Source will include:
| Field | Source | Example |
|---|---|---|
event_name | Client | page_view |
page_url | Client | https://measureaddict.com/post/... |
page_path | Client | /post/... |
page_title | Client | How to Build a First-Party... |
page_referrer | Client | https://google.com |
screen_width | Client | 1440 |
language | Client | en-GB |
client_ip | Server | 203.0.113.42 |
user_agent | Server | Mozilla/5.0 ... |
server_timestamp_ms | Server | 1750000000000 |
From here you can route these events to any connector in Tealium’s ecosystem — GA4, BigQuery, Segment, or your own data warehouse.
Caveats Worth Knowing
This is not a replacement for consent management. You still need to gate the collect.js script behind a consent check if you’re collecting personal data under GDPR or similar regulations. The proxy pattern doesn’t change your legal obligations — it only changes the transport layer.
Server-side enrichment has limits. You’ll get the real IP and user agent, but you won’t have access to cookies set by other scripts (like GA’s _ga client ID) unless you explicitly read and forward them from the client. If you need to stitch server-side events with existing GA sessions, you’ll need to pass the client ID along in the event payload.
Cold starts. Netlify Functions have cold start latency on the first invocation after a period of inactivity — typically 200–500ms. Subsequent calls are much faster. Since analytics collection uses sendBeacon (fire-and-forget), the user never waits for this, but it’s worth knowing if you’re checking response times in DevTools.
Summary
The first-party proxy pattern is a fairly small amount of infrastructure for a meaningful improvement in data completeness, especially for an audience likely to be running ad blockers 😉. Three files, four environment variables, and you get full-fidelity event collection flowing through your own domain into Tealium’s server-side pipeline.
Would you like to find out more or have questions or feedback? Please feel free to leave comments below or contact me directly.
If you found this useful, please share!
Thanks for reading!
Happy measuring!